Explore six ways of cooking corn on the cob. You'll learn how to cook corn on the grill, roast in the oven, and cook in a slow cooker, air fryer, and stovetop.
Ah, summer—the season when corn reaches its peak, both in flavor and in its role as the star side dish of sunny days and backyard barbecues. Whether you enjoy it beside a sizzling grill, at a picnic table, or as the centerpiece of a family feast, corn on the cob doesn’t just feed the masses—it brings us together, every delicious kernel helping to light up our gatherings in the warm, golden glow of the season.
6 Ways to Make Corn on the Cob
Did you know there’s more than one way to cook corn on the cob? From the smoky char of grilling to the ease and tender results from cooking in the microwave, get ready to elevate this popular vegetable into a star ingredient for summer meals and year-round. Follow along as we explore 6 methods, each offering a unique texture and flavor profile.
PREPARING CORN ON THE COB
Preparing corn for cooking is both an art and a science. If you're aiming for that classic corn on the cob, you'll start by husking the corn, peeling away the outer layers and silk to reveal the shiny kernels beneath. This method is perfect for direct heat on the kernels, whether grilling, roasting, or boiling them to golden perfection.
However, if you want a smokier, more nuanced flavor, try leaving the husk on while grilling. The husk protects the corn from burning while infusing it with a subtle, earthy aroma. Even better, leaving the husk on when microwaving corn on the cob makes a quick, one-step method to cook, carefully remove the husk, and quickly shed those pesky corn silks. Stay tuned for details on this handy silk-removing tip later.
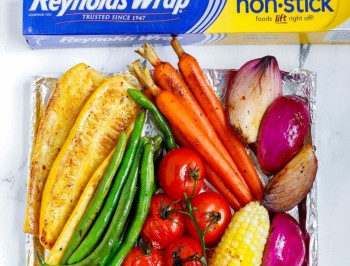
Wrapping corn in foil packets is a fantastic way to infuse it with flavors while keeping it moist and tender. What’s more, corn in foil packets can allow you to:
Make ahead for a big crowd for easy grilling or oven-roasting
Customize each packet for each person’s taste preferences
There's nothing quite like the ritual of husking fresh corn, those silk threads stubborn as sunbathers refusing to leave the beach at sunset. Luckily, there are plenty of corn silk removal hacks out there. Here are a few that have risen to the top as the best methods:
Using a brush: After shucking the corn, use a vegetable brush (or even a clean toothbrush) to remove any remaining silks on your ear of corn.
Using a glove: Once you’ve peeled away the leaves and silks, rub the surface of the ear with a disposable nitrile or medical glove.
Boiling in water: Place the whole, untrimmed, and unshucked ears of corn in a large pot of lightly salted boiling water. Cover the pot and cook for 5 to 8 minutes. Allow the corn to cool until you can handle it, then remove the husk. The silk will come off quickly with the husk.
Microwaving: Place two whole, unshucked ears of corn in the microwave for eight minutes. If you want to add corn ears, add four minutes for each. Use oven mitts or gloves to remove from the microwave and place on a cutting board. Slice off the stem ends of the corn. Using your oven mitts or gloves, grasp the corn at the top tapered end and shake the ear free of the husk and silk.
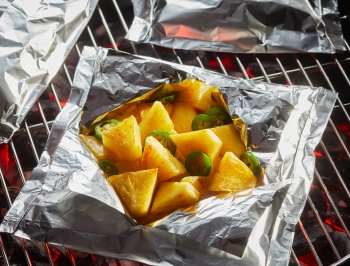
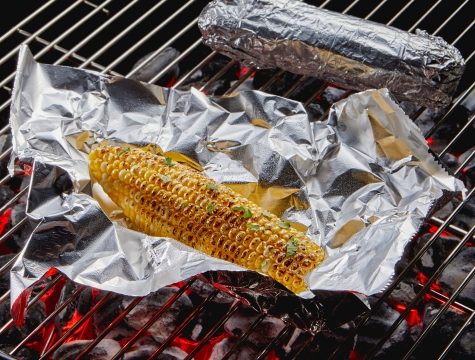
Grilling Corn on the Cob in Foil
Grilling corn on the cob in foil is a simple and delicious way to enjoy this summer staple. Wrapped snugly in its silvery foil cocoon, the corn steams in its juices, mingling with butter and a medley of spices, emerging as a tender, flavor-packed delight that promises to steal the show at any barbecue. Whether you're a seasoned grill master or a weekend warrior, this method to grill ears of corn is foolproof, fun, and fabulously delicious. So, grab your foil, and let's turn up the heat on your new favorite way to savor summer's golden bounty.
Preheat your grill to medium-high, around 350°F to 450°F.
Prepare the corn: Husk the corn by removing the outer leaves and silk. Rinse the corn under cold running water to clean it.
Butter and season: Lay each ear of corn on a piece of Heavy Duty aluminum foil large enough to wrap around the corn thoroughly. Smear butter over the corn and season it to your liking. (Tip: you can use olive oil or coconut oil instead if you like.) Typical seasonings include salt, pepper, garlic powder, and herbs like parsley or cilantro. For a bit of spice, sprinkle some chili powder or cayenne pepper.
Wrap the corn: Bring the sides of the foil up around the corn and fold them together, then fold in the ends to create a sealed packet. Ensure the foil is sealed tightly so that steam doesn’t escape during cooking, which helps keep the corn moist.
Grill the corn: Place the foil packets on the grill and close the lid. Grill the corn for about 15 to 20 minutes, turning every 5 minutes to ensure even cooking. When done, the corn should be tender.
Check for doneness: Carefully open one of the packets to check if the corn is cooked. It should be bright yellow, slightly charred (if the foil is opened during grilling), and tender.
Serve and enjoy: Remove the corn from the grill and let it sit for a few minutes before opening the rest of the packets (watch out for steam). Serve the corn hot, with additional butter, if desired, and any leftover seasonings.
With just a microwave and a few minutes, you can transform those golden ears into steaming, buttery cobs ready to be devoured. Cooking fresh corn in the microwave offers easy cleanup and helps you get dinner on the table fast. Pop in a raw cob wrapped in parchment paper or wax paper, and in the time it takes to set the table, you're rewarded with perfectly cooked corn that's hot, tender, and begging for a pat of butter.
MICROWAVING CORN ON THE COB WITHOUT HUSK
You can microwave corn on the cob without the husk using parchment paper or wax paper. Either way, you’ll get delicious results, so try them both to see which is your favorite!
Microwave corn on the cob parchment paper or wax paper method
Prepare: Shuck and clean fresh ears of corn and wrap each ear in parchment or wax paper.
Cook: Microwave for 2 minutes per unshucked ear of corn. (For four ears, 8 minutes).
Remove from microwave: Remove from the microwave using oven mitts or gloves.
Serve and enjoy! Carefully unwrap the wax or parchment paper, brush with butter, and top with salt or other seasonings you love.
MICROWAVING CORN ON THE COB IN THE HUSK
We’ve already spoiled the secret of microwaving corn on the cob in the husk using our microwave method to remove corn silks. But guess what? There’s more! Not only do you get rid of the silks in one fell swoop, but the husks will lock in the moisture to get the natural juiciness out of your corn. To save on cleanup, lay a sheet of Reynolds Kitchens® Parchment Paper or Reynolds Kitchens® Cut-Rite Wax Paper on the bottom of your microwave or turntable to catch any debris or juices from your unhusked corn.
As a rule of thumb, each corn on the cob in the husk will take about 3-4 minutes on HIGH, depending on the size of your corn ear and the wattage of your microwave. Check your microwave instructions before cooking. You may need to cook in 30-second increments until your corn softens. Keep an eye on your microwave to help ensure proper cooking.
Microwaving corn on the cob is the quickest way to cook and eat it. It's best for small servings. If you're making corn on the cob for a big group, it's better to roast corn on a grill or in an oven.
Oven-roasted corn cobs offer a twist to your typical corn cooking methods. Whether you're looking to cook corn on the cob in the oven for a cozy family dinner or a festive gathering, this method is your ticket to effortless roasted ears of corn. Learning how to oven-roast corn is a breeze—wrap those golden beauties in foil or leave them in their husks, slide them into the oven, and let the magic happen. Wrapping them in foil or husks acts as a natural moisture barrier, infusing each kernel with roasted sweetness as they cook. So, preheat your oven and get ready to roast corn in the oven, transforming it into a caramelized, irresistible treat that will have everyone asking for seconds.
OVEN ROASTED CORN COBS IN THE HUSK
Want to oven-roast corn without fuss or shucking? Try roasting corn in the husk in the oven. It’s so easy and saves time from waiting for a pot of boiling water to boil.
Let’s start roasting:
Preheat oven to 350°F
Place in the oven: Directly place the corn ears with husks on the oven rack
Roast: 30 minutes until the corn is tender and soft
Rest: Using an oven mitt or glove, remove the corn from the oven and allow it to rest for 2–3 minutes until easily handled
Peel off the husk and silk: Add butter, seasonings, and toppings of your choice and enjoy!
OVEN ROASTED CORN COBS WRAPPED IN ALUMINUM FOIL
With about five minutes of prep time, oven-roasted corn cobs wrapped in aluminum foil are easy and delicious. Coating your ears of corn with butter and adding delicious savory seasonings before you cook will infuse the flavor into the corn. Get your taste buds ready.
Preheat oven to 425°F
Prepare: Husk your corn and remove any stray silks. Rinse your corn with cold water. Tear sheets of aluminum foil large enough to cover each ear of corn completely. Lay one ear of corn in the middle of the foil sheet.
Butter and season: Melt butter and add seasonings like salt, parsley, garlic, pepper, rosemary, thyme, or your favorites. Spread or brush the melted butter and seasonings on the corn. Wrap the foil tightly around each ear of corn.
Roast: Place the foil-wrapped corn on a baking sheet. Bake until the corn is soft and tender, about 20-25 minutes. Turn the ears once about halfway through the cooking time.
Allow the corn to rest for 2–3 minutes before unwrapping. Carefully pull open the foil to remove the ears (watch for the steam). Add additional butter and seasonings if you desire. Enjoy!
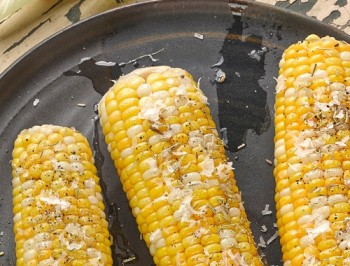
OVEN ROASTED CORN COBS ON A SHEET PAN
Don't have a grill but crave the taste of grilled corn? No problem! You can achieve the same delicious roasted flavor using just a sheet pan. Enjoy those sweet and toasty kernels without needing an open flame. Even better, cleanup is a breeze.
Preheat oven to 400°F.
Prepare: Line a baking sheet with aluminum foil or parchment paper and place the ears of corn on the baking sheet. Slather butter liberally on all sides of the ears of corn. Sprinkle each ear with salt and pepper or seasonings of your choice.
Roast: Bake the corn, turning occasionally, for 30-45 minutes until the corn starts to brown.
Remove: Carefully remove the baking sheet from the oven, spread more butter evenly over the ears, and add more seasonings if desired.
Of course, we can’t forget to include a cooking method for air-frying corn. Air-fried corn on the cob is your ticket to a quick, crispy, and utterly delicious side dish that’ll make you rethink corn cooking. You achieve that perfect golden char with air-fried corn without the hassle of firing up the grill or oven. Simply toss those ears into the air fryer. The result? Each kernel bursts with flavor and is perfectly cooked with a hint of crunch.
STEPS FOR AIR FRYING CORN ON THE COB
Every air fryer is different, so check and follow your air fryer manufacturer’s directions for cooking corn on the cob. These directions are for four ears of corn using an air fryer with a six-quart basket.
Preheat: Set your air fryer to 400°F and preheat for 5 minutes.
Prepare: Husk your corn and rinse your corn ears with cold water. Pat dry. Brush corn with olive oil and sprinkle with salt.
Air fry corn: Place a Reynolds Kitchens® Air Fryer Liner in the bottom of the basket. Place the oiled and seasoned ears of corn in the air fryer basket. Air fry at 400°F for about 14 minutes, turning halfway through the cooking time. Cook until tender and slightly brown.
Serve and enjoy!
Want to reheat air-fried, grilled, or oven-roasted corn on the cob? Preheat the air fryer to 400°F for five minutes. Place a Reynolds Kitchens® Air Fryer Liner in the bottom of your basket, set the corn on top, and heat until warmed thoroughly, about 2–3 minutes.
Imagine slipping into a world where corn on the cob cooks itself while you kick back and relax. Welcome to the ease of making corn on the cob in a slow cooker. One method is to cook corn on the cob in a slow cooker using a slow cooker liner. Another is to cook corn on the cob in foil. Both methods free you from the kitchen, make cleanup easy, and create a dish that tastes like sunshine on a plate.
So, gather your ingredients and let the gentle heat coax out the sweet, buttery flavors of slow cooker corn on the cob. It's time to slow down and savor the simplicity of great food made easy.
CORN COB SLOW COOKER METHOD
This simple method requires minimal preparation. Corn cooks in a 6-quart slow cooker and is ready to eat in just a few hours. A slow cooker liner makes cleanup faster and easier.
Directions:
Prepare: Husk 6–8 ears of corn on the cob, rinse with cold water, and cut into halves or thirds to fit them easier into a six-quart slow cooker. Lightly brush the corn with melted butter or olive oil and sprinkle with salt and pepper.
Place: Insert your slow cooker liner. Add 2/3 cup of water into the slow cooker. Add in corn and cover.
Cook: On the HIGH setting, cook for about 3–4 hours. Once the corn is tender and hot, stir in about 2/3 cup of butter (to taste) and toss the corn in the butter.
Feel free to add seasonings and toppings if desired. Enjoy!
FOIL-WRAPPED CORN ON THE COB IN A SLOW COOKER
Like grilling or baking corn in aluminum foil, the wrapped ears cook in the steam created by the foil, allowing the corn to soak up all the flavor.
Directions:
Prepare: Husk 8 small ears of corn. Tear a square sheet of Reynolds Wrap® foil and place one ear of corn in the middle. Top with 1 ½ teaspoons of butter. Wrap corn and place in a six-quart oval slow cooker. Repeat with the remaining corn.
Cook: Cook on LOW for 4 hours or HIGH for 2 hours.
Serve and enjoy: If desired, serve with additional butter, seasonings, and toppings.
This traditional method is timeless and reliable for cooking corn on the cob. Boiling corn on the cob on the stove is a culinary rite of passage that steams fresh ears into a tender, juicy treat.
HOW TO COOK CORN ON THE COB ON THE STOVE
Learning how to boil corn on the cob on the stove is as easy as water, salt, and a little patience. The key question of how long to boil an ear of corn has long been debated. We will answer this question and demonstrate how delicious buttery corn is just a simmer away.
Grab your biggest kettle and get cooking:
Prepare: Boil a large pot of water over high heat. The water level should be about one-half to two-thirds full to leave room for the corn. While waiting for the water to boil, husk the corn and rinse with cold water. Once the water has reached the boiling point, turn the heat down to medium-high and season generously with salt.
Cook the corn: Using tongs, add the corn to the boiling water. Don’t overcrowd the ears. Provide enough space for them to be fully submerged in the water and cook evenly. If you prefer tender yet crisp kernels, cook for about 4–5 minutes. If you like your kernels on the more tender side, cook for 8–10 minutes.
Yes, overcooking can result in chewy and overly firm kernels. For the following cooking methods, follow these guidelines to avoid overcooking:
Cook in the microwave on high for 3–5 minutes
Grill corn until light char marks form and the kernels are bright yellow. Insert a fork or small paring knife in the thickest kernels of the cob. The kernels should be tender and easily pierced.
Cook for 8–10 minutes or less in boiling water. If you boil the corn for too long, the starch content will absorb too much water, and its pectin will dissolve, resulting in kernels with a soggy texture.
There are two reasons why your corn may be tough and chewy:
Your corn cobs aren’t fresh. When choosing corn, pick ears with firm kernels that still have the husk. The husk should be a bright green and show no signs of being dried out or having small brown holes, which can signify insects. Look for plenty of visible silk and avoid ears with black or mushy tassels. Also, steer clear of corn with brown bottoms, which likely means it's several days old.
Your corn is overcooked. See more information in the FAQ, “Can you overcook corn?”
Yes. You can freeze corn by slicing off the kernels and freezing them raw or cooked in an airtight container. You can also wrap and freeze whole cooked cobs in Reynolds Kitchens® Plastic Wrap or Reynolds Kitchens® Freezer Paper and seal them in airtight freezer bags.


 Want to reheat air-fried, grilled, or oven-roasted corn on the cob? Preheat the air fryer to 400°F for five minutes. Place a Reynolds Kitchens® Air Fryer Liner in the bottom of your basket, set the corn on top, and heat until warmed thoroughly, about 2–3 minutes.